Tuesday, August 31, 2010

YAGRAC

I've been wanting to learn how to develop for the Android platform, and I recently took some time to start a project to do just that. YAGRAC is Yet Another GoodReads Android Client. I've made the source code open source, so feel free to take a look or download the client and let me know what you think.

GoodReads is a social book reading service that I am a huge fan of. You can keep track of books that you have read, want to read, or are currently reading. Your friends can follow your list of books to see what you are up to. It is great for finding like-minded readers and discovering new books to enjoy. The GoodReads site is great, but when I'm away from my desk the mobile site leaves me wishing for more. GoodReads does not have an official app for iPhone or Android, so I though, why not make one myself! So far I have implemented the ability to read updates from friends, browse books on my own shelves or someone else's shelves, search for books, and review my list of social contacts (friends, followers, and following).

This project has proven to be a very good and effective learning opportunity. As I encounter interesting bits I will be sure to share them here.

Thursday, May 27, 2010

Creating a RESTful web service using WCF and JSON

There are a vast number of technologies to choose from for implementing a web application. You can choose Flash, Silverlight, Java, HTML, JavaScript, CSS, ASP.NET, PHP, and a host of others. Putting aside arguments for or against such an approach, let's examine how we might create a RESTful web service in WCF that accepts and emits JSON.
First, we need to create a project. Create a new ASP.NET web application. We can delete the Default.aspx file as we will not be using it.
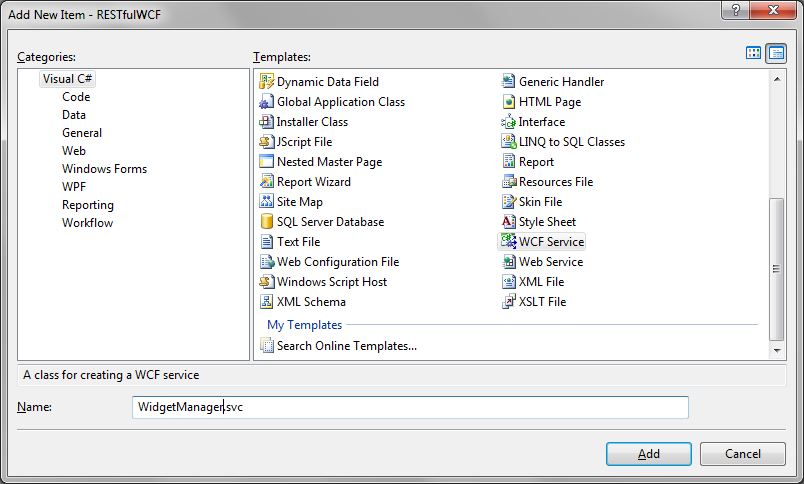
Next, let's add a WCF service to our project. When naming this service, keep in mind that this is your access point to the resource that is represented in our RESTful interface. If we are talking about Widgets, we might want to name it WidgetManager.svc. This will create three files for us:
  • IWidgetManager.cs - The interface describing service contract
  • WidgetManager.svc - The web service definition (markup)
  • WidgetManager.svc.cs - The web service implementation
First examine the code for our contract.
using System.ServiceModel; namespace RESTfulWCF { [ServiceContract] public interface IWidgetManager { [OperationContract] void DoWork(); } }
We need to indicate that this web service will be using JSON for communicating to the client. To do that we modify the service method description.
[OperationContract] [WebInvoke( ResponseFormat = WebMessageFormat.Json, BodyStyle = WebMessageBodyStyle.Bare)] void DoWork();
Notice that we need to add a reference to System.ServiceModel.Web to our project and add a using statement to include the definition of the WebInvoke attribute. The next step is to indicate which of the REST actions (GET, PUT, POST, DELETE) the method will correspond to, and what REST URL format is used to call this method. Let's say that our web service method is intended to retrieve a list of all of the widgets known to the system.
[OperationContract] [WebInvoke( Method = "GET", ResponseFormat = WebMessageFormat.Json, BodyStyle = WebMessageBodyStyle.Bare, UriTemplate = "Widgets")] void GetWidgets();
That completes the definition of our web service contract. Assuming our site is hosted at the root of localhost, it is accessed using a GET request against the URL http://localhost/WidgetManager.svc/Widgets and will respond with JSON. But wait, our response type is void. Let's define a complex data type to represent the properties of our widget and return a collection of those widgets from our method.
using System.Runtime.Serialization; namespace RESTfulWCF { [DataContract] public class Widget { [DataMember] public string Name { get; set; } [DataMember] public int SprocketSize { get; set; } [DataMember] public int CogCount { get; set; } } }
And we update our return type to be a collection of this type.
[OperationContract] [WebInvoke( Method = "GET", ResponseFormat = WebMessageFormat.Json, BodyStyle = WebMessageBodyStyle.Bare, UriTemplate = "Widgets")] Widget[] GetWidgets();
We need the function to return at least one item in our array to effectively demonstrate this code. Open the WidgetManager.svc.cs code behind file and implement the web service.
using System.Collections.Generic; namespace RESTfulWCF { public class WidgetManager : IWidgetManager { public Widget[] GetWidgets() { List widgets = new List(); widgets.Add( new Widget { CogCount = 3, Name = "Widget Alpha", SprocketSize = 6 } ); return widgets.ToArray(); } } }
We now need to tweak our web.config file so that the web server and the class description are in sync. We could define our service behavior in the web.config as well, but in this case it is easier to use a factory to set that up on our behalf. Open the WidgetManager.svc file markup and add the Factory.
<%@ ServiceHost Language="C#" Debug="true" Service="RESTfulWCF.WidgetManager" CodeBehind="WidgetManager.svc.cs" Factory="System.ServiceModel.Activation.WebServiceHostFactory" %>
We still need to make a change to our web.config, but now we only need to define the endpoint behavior.
<system.serviceModel> <behaviors> <endpointBehaviors> <behavior name="RESTfulWCF.WidgetManagerEndpointBehavior"> <webHttp/> </behavior> </endpointBehaviors> </behaviors> <services> <service name="RESTfulWCF.WidgetManager"> <endpoint address="" binding="webHttpBinding" behaviorConfiguration="RESTfulWCF.WidgetManagerEndpointBehavior" contract="RESTfulWCF.IWidgetManager"> </endpoint> </service> </services> </system.serviceModel>
That's all we need to get started with this simple example. Compile the project and run. You will see a webpage that indicates the endpoint was not found. This is because the default start page is the service file, rather than the REST URL. Modify the URL to http://localhost/WidgetManager.svc/Widgets and you will get the JSON result emitted back.
[{"CogCount":3,"Name":"Widget Alpha","SprocketSize":6}]
The next thing we will want to do is accept a parameter in the request. To do this, create a new service method that accepts a parameter, in our case the ID of the widget to return.
[OperationContract] [WebInvoke( Method = "GET", ResponseFormat = WebMessageFormat.Json, BodyStyle = WebMessageBodyStyle.Bare, UriTemplate = "Widgets/{widgetId}")] Widget GetWidget(string widgetId);
And remember to implement the method in our code behind file.
public Widget GetWidget(string widgetId) { return new Widget { CogCount = 3, Name = widgetId, SprocketSize = 6 }; }
Now when we run the project and browse to the URL http://localhost/WebService.svc/Widgets/117 we see the output widget carries the name we supplied in the URL.
{"CogCount":3,"Name":"117","SprocketSize":6}
An important note here is that the parameters passed in to the web service method in this way must all be strings. A UriTemplate may contain as many parameters as you like, and may appear anywhere in the URI. So a URI template of 'Widgets/{widgetId}/Cogs/{cogId}/Color' is completely acceptable.
This is just scratching the surface though, as we still haven't touched on the other three REST operations (PUT, POST, and DELETE). There are a number of options on the data contract attributes that allow you to modify the names of the JSON elements, as well as the order they appear in the JSON string. Source code for the example in this post is available here:

Friday, May 21, 2010

Indy Tech Fest 2010 Slides

Click the image above to download my slide deck for "Getting Started with Online Mapping Services" presented at Indy Tech Fest 2010.

Monday, April 19, 2010

Developing with Online Mapping APIs - Part 6: Custom Drawing

At this point we've covered all of the basics. You have all the tools you need to display an interactive map with rich information. You also have some information that will help you to decide which vendor API is best suited for your task. Now let's do something a little more fun. Let's try doing some custom drawing on our maps. Custom drawing is the ability to draw lines and polygons (filled and unfilled) on our map, and potentially to even overlay text and images. The degree to which you can plot custom elements on the map varies across mapping APIs, so let's take a look at what kind of interesting things we can do on each.

Bing

The VEShape class provides all the tools we need for doing custom drawing on a Bing map. With a VEShape instance we can:

  • Draw text
  • Plot an image
  • Draw a polyline (a line with multiple segments)
  • Draw an unfilled polygon
  • Draw a filled polygon

We can control the color of the text, line, and fill. We can also assign a transparency value (alpha) to the fill and line color. When we use a VEShape, the shape we put on the map is anchored to the map at the lattitude and longitude of the points we assign.

Adding text to the map is as simple as creating a VEShape of type VEShapeType.Pushpin and then assigning the text to display using the SetCustomIcon() method. Be sure to wrap the text in a SPAN or DIV tag, otherwise the text will be interpretted as the URL of an image. Also, the Bing map will wrap this custom HTML in an A tag, so you may want to assign some styles to your DIV or SPAN tag to be sure the text is displayed the way you want. As mentioned, as long as the argument given to the SetCustomIcon method doesn't start with a '<', it is assumed to be the URL of an image to display. This is how we can display an image on our map.

When creating a polygon using the Bing map API, an array of vertices is passed to the VEShape constructor. When drawing the shape, the API will automatically creating a line segment between the last vertex and the first vertex. The API only supports line segments (no arcs) so it is not possible to draw smooth curves. Still, we can fake up a curves by using a number of small line segments.

function bingPlotCircle(scalar)
{
 var vertexCount = 64;
 var vertices = new Array();
 var v = 0;
 var radians = Math.PI / 180;
    var radiansPerDegree = Math.PI / 180;
 var degreesPerVertex = 360 / vertexCount;
 var radiansPerVertex = degreesPerVertex * radiansPerDegree;
    var mapCenterLatLong = bingMap6.GetCenter();
 var mapView = bingMap6.GetMapView();

 var mapHeight = mapView.TopLeftLatLong.Latitude - mapCenterLatLong.Latitude;
 var mapWidth = mapView.TopLeftLatLong.Longitude - mapCenterLatLong.Longitude;

 for ( v = 0; v < vertexCount; v++ )
 {
  radians = v * radiansPerVertex;
  vertices.push( 
   new VELatLong(  
    mapCenterLatLong.Latitude + ( scalar * mapHeight * Math.sin( radians ) ), 
    mapCenterLatLong.Longitude + ( scalar * mapWidth * Math.cos( radians ) ) ) );
 }

 var circle = new VEShape(VEShapeType.Polygon, vertices);
 circle.SetFillColor( new VEColor( 128, 0, 0, 0.2 ) );
 circle.SetLineColor( new VEColor( 128, 0, 0, 0.2 ) );
 circle.SetLineWidth( 1 );
 circle.HideIcon();

 bingMap6.AddShape( circle );
}

function bingPlotLines()
{
 var vertices = new Array();
 var bounds = bingMap6.GetMapView();
 var center = bingMap6.GetCenter();
 vertices.push( new VELatLong( bounds.TopLeftLatLong.Latitude, center.Longitude ) );
 vertices.push( new VELatLong( bounds.BottomRightLatLong.Latitude, center.Longitude ) );

 var verticalLine = new VEShape( VEShapeType.Polyline, vertices );
 verticalLine.SetLineWidth(6);
 verticalLine.HideIcon();
 bingMap6.AddShape(verticalLine);

 vertices = new Array();
 vertices.push( new VELatLong( center.Latitude, bounds.TopLeftLatLong.Longitude ) );
 vertices.push( new VELatLong( center.Latitude, bounds.BottomRightLatLong.Longitude ) );

 var horizontalLine = new VEShape( VEShapeType.Polyline, vertices );
 horizontalLine.SetLineWidth(6);
 horizontalLine.HideIcon();
 bingMap6.AddShape(horizontalLine);
}

function bingPlotText()
{
 var textShape = new VEShape( VEShapeType.Pushpin, bingMap6.GetCenter() );
 textShape.SetCustomIcon("BULLSEYE");
 bingMap6.AddShape(textShape);
}

function bingPlotImage()
{
 var imageShape = new VEShape( VEShapeType.Pushpin, bingMap6.GetCenter() );
 imageShape.SetCustomIcon("target.jpg");
 bingMap6.AddShape(imageShape);
}

Google

You know the story by now - where Bing consolidates functionality to a single class, Google separates into many classes. The same holds for custom drawing. With Google Maps we can:

  • Plot an image
  • Draw a polyline (a line with multiple segments)
  • Draw an unfilled polygon
  • Draw a filled polygon

Unlike Bing, which used the VEShape class for all of these, Google uses several:

  • GIcon
    • Plot a custom image
  • GPolyline
    • Draw a polyline
  • GPolygon
    • Draw a polygon (filled or unfilled)

Another difference between the Bing and Google implementation is that with the Google classes, most of the options for the shape are set in the constructor. Using named parameters we can set the line width, color, opacity, fill color, and fill opacity.

function googlePlotCircle(scalar)
{
 var vertexCount = 64;
 var vertices = new Array();
 var v = 0;
 var radians = Math.PI / 180;
    var radiansPerDegree = Math.PI / 180;
 var degreesPerVertex = 360 / vertexCount;
 var radiansPerVertex = degreesPerVertex * radiansPerDegree;
    var center = googleMap6.getCenter();
 var bounds = googleMap6.getBounds();

 var mapHeight = bounds.getNorthEast().lat() - center.lat();
 var mapWidth = bounds.getNorthEast().lng() - center.lng();

 for ( v = 0; v < vertexCount; v++ )
 {
  radians = v * radiansPerVertex;
  vertices.push( 
   new GLatLng(  
    center.lat() + ( scalar * mapHeight * Math.sin( radians ) ), 
    center.lng() + ( scalar * mapWidth * Math.cos( radians ) ) ) );
 }

 var circle = new GPolygon(vertices, "#800000", 1, 0.2, "#800000", 0.2);
 googleMap6.addOverlay( circle );
}

function googlePlotLines()
{
 var vertices = new Array();
 var bounds = googleMap6.getBounds();
 var center = googleMap6.getCenter();
 vertices.push( new GLatLng( bounds.getSouthWest().lat(), center.lng() ) );
 vertices.push( new GLatLng( bounds.getNorthEast().lat(), center.lng() ) );

 var verticalLine = new GPolyline( vertices, "#0000FF", 6 );
 googleMap6.addOverlay(verticalLine);

 vertices = new Array();
 vertices.push( new GLatLng( center.lat(), bounds.getSouthWest().lng() ) );
 vertices.push( new GLatLng( center.lat(), bounds.getNorthEast().lng() ) );

 var horizontalLine = new GPolyline( vertices, "#0000FF", 6 );
 googleMap6.addOverlay(horizontalLine);
}

function googlePlotImage()
{
 var imageIcon = new GIcon( G_DEFAULT_ICON, "target.jpg" );
 var imageShape = new GMarker( googleMap6.getCenter(), { icon:imageIcon } );
 googleMap6.addOverlay(imageShape);
}

One key difference here is that the Google Maps API does not supply a method to plot text onto the map. There are a few workaround options. One is to create an image containing the text, but this makes internationalization of the text difficult. Another workaround is to use a GIcon marker and display the desired text when the info window is displayed. This has the drawback of not displaying the text when the info window is hidden. A third option is to implement your own overlay class that inherits from GMarker, such as this LabeledMarker demonstrated by Michael Purvis. Finally, there are third-party libraries such as ELabel that include text overlay functionality. Even with these options, not including a text overlay in the stock API seems to be an oversight in my opinion.

Yahoo

With the Yahoo Maps API we can:

  • Draw text
  • Plot an image
  • Draw a polyline (a line with multiple segments)

In the case of the Yahoo Maps API there are a few classes that play a role here:

  • YImage
    • YImage is not an overlay by itself, but instead defines how an image will be displayed. The image is then supplied as part of the constructor for a YMarker, which plots the image on the map.
  • YMarker
    • Used both for plotting standard points of interest as well as for images.
  • YCustomOverlay
    • An all purpose overlay. Supply whatever HTML you like to this element and it will be plotted on the map at the given point.
  • YPolyline
    • Draws a polyline on the map, with variable line width, color, and opacity.

Missing from this list is the ability to draw a filled polygon. Drawing an unfilled polygon is as simple as using the YPolyline and supplying an the first vertex as the last, thus joining the polygon together. However, if you are looking to have a filled shape, you are out of luck.

function yahooPlotCircle(scalar)
{
 var vertexCount = 64;
 var vertices = new Array();
 var v = 0;
 var radians = Math.PI / 180;
    var radiansPerDegree = Math.PI / 180;
 var degreesPerVertex = 360 / vertexCount;
 var radiansPerVertex = degreesPerVertex * radiansPerDegree;
    var center = yahooMap6.getCenterLatLon();
 var bounds = yahooMap6.getBoundsLatLon();

 var mapHeight = bounds.LatMax - center.Lat;
 var mapWidth = bounds.LonMax - center.Lon;

 for ( v = 0; v < vertexCount; v++ )
 {
  radians = v * radiansPerVertex;
  vertices.push( 
   new YGeoPoint(  
    center.Lat + ( scalar * mapHeight * Math.sin( radians ) ), 
    center.Lon + ( scalar * mapWidth * Math.cos( radians ) ) ) );
 }
 vertices.push( vertices[0] );

 var circle = new YPolyline(vertices, "#FF0000", 3);

 yahooMap6.addOverlay( circle );
}

function yahooPlotLines()
{
 var vertices = new Array();
 var bounds = yahooMap6.getBoundsLatLon();
 var center = yahooMap6.getCenterLatLon();
 vertices.push( new YGeoPoint( bounds.LatMax, center.Lon ) );
 vertices.push( new YGeoPoint( bounds.LatMin, center.Lon ) );

 var verticalLine = new YPolyline( vertices, "#0000FF", 6 );
 yahooMap6.addOverlay(verticalLine);

 vertices = new Array();
 vertices.push( new YGeoPoint( center.Lat, bounds.LonMax ) );
 vertices.push( new YGeoPoint( center.Lat, bounds.LonMin ) );

 var horizontalLine = new YPolyline( vertices, "#0000FF", 6 );
 yahooMap6.addOverlay(horizontalLine);
}

function yahooPlotText()
{
 var labelNode = YUtility.createNode('div', 'yahooLabelOverlay');
 labelNode.style.color = "#0000FF";
 labelNode.style.backgroundColor = "#FFFFFF";
 labelNode.innerHTML += 'BULLSEYE';
 var textOverlay = new YCustomOverlay(yahooMap6.getCenterLatLon());
 YUtility.appendNode(textOverlay, labelNode);
 yahooMap6.addOverlay(textOverlay);
}

function yahooPlotImage()
{
 var image = new YImage("target.jpg");
 var imageOverlay = new YMarker(yahooMap6.getCenterLatLon(), image);
 yahooMap6.addOverlay(imageOverlay);
}

The Yahoo Maps implementation of overlays is a little quirky, especially when it comes to polylines. You may find that your polylines are not drawn properly when changing the zoom level, especially when using a double-click to zoom.

The code necessary to plot text may look a little strange, and that is because it is. The Yahoo Maps API supplies a couple of helper classes, and here we use the YUtility class to add our HTML node that we want to draw as our text overlay. It's a little cumbersome to add to add text in this way, but it does work. I tried using the method of supplying the HTML for the text as a direct parameter to the YCustomOverlay constructor, but this did not appear to work. Your mileage may vary.

MapQuest

The MapQuest API allows us to:

  • Draw text
  • Plot an image
  • Draw a polyline (a line with multiple segments)
  • Draw an filled / unfilled polygon
  • Draw a filled / unfilled ellipse

The MapQuest API divides the drawing jobs among several overlay classes:

  • MQA.RectangleOverlay
    • Draws a rectangle based on two points defining opposite corners of the rectangle.
  • MQA.LineOverlay
    • Draws a multi-segment line (polyline).
  • MQA.PolygonOverlay
    • Draws a polygon, filled or unfilled.
  • MQA.EllipseOverlay
    • Draws an ellipse based on two points defining the opposite corners of a bounding rectangle.
  • MQA.ImageOverlay
    • Draws an image based on two points defining the opposite corners of a bounding rectangle.

The MapQuest API is unique in that it provides special overlays that reduce the number of points needed to define a rectangle and an ellipse. With the other APIs we have had to define our ellipse by creating enough line segments that the shape has the illusion of curvature. The MapQuest API actually draws a curve. Another interesting difference is that when we plot an image using the ImageOverlay, the image will stretch and shrink to cover the same area as we change our zoom level. If this is not the intent, an image can instead be supplied to a MQA.Poi to give the same effect as seen in the other mapping API's. The MapQuest API does not have a specific overlay for text, but text labels can be created by setting the HTMLContent value of a MQA.Poi.

function mapquestPlotCircle(scalar)
{
 var vertexCount = 64;
 var vertices = new MQA.LatLngCollection();
    var center = mapquestMap6.getCenter();
 var bounds = mapquestMap6.getBounds();

 var latDiff = scalar * ( center.getLatitude() - bounds.getUpperLeft().getLatitude() );
 var latMax = center.getLatitude() + latDiff;
 var latMin = center.getLatitude() - latDiff;
 var lonDiff = scalar * ( center.getLongitude() - bounds.getUpperLeft().getLongitude() );
 var lonMax = center.getLongitude() + lonDiff;
 var lonMin = center.getLongitude() - lonDiff;

 vertices.add( new MQA.LatLng( latMax, lonMax ) );
 vertices.add( new MQA.LatLng( latMin, lonMin ) );

 var circle = new MQA.EllipseOverlay();
 circle.setValue('shapePoints', vertices);
 circle.setValue('fillColor', '#800000');
 circle.setValue('fillColorAlpha', 0.2);
 circle.setValue('color', '#800000');
 circle.setValue('colorAlpha', 0.2);
 circle.setValue('borderWidth', 1);

 mapquestMap6.addShape( circle );
}

function mapquestPlotLines()
{
 var vertices = new MQA.LatLngCollection();
 var bounds = mapquestMap6.getBounds();
 var center = mapquestMap6.getCenter();
 vertices.add( new MQA.LatLng( bounds.getUpperLeft().getLatitude(), center.getLongitude() ) );
 vertices.add( new MQA.LatLng( bounds.getLowerRight().getLatitude(), center.getLongitude() ) );

 var verticalLine = new MQA.LineOverlay();
 verticalLine.setValue('shapePoints', vertices);
 verticalLine.setValue('color', '#0000FF');
 verticalLine.setValue('borderWidth', 6);
 mapquestMap6.addShape(verticalLine);

 vertices = new MQA.LatLngCollection();
 vertices.add( new MQA.LatLng( center.getLatitude(), bounds.getUpperLeft().getLongitude() ) );
 vertices.add( new MQA.LatLng( center.getLatitude(), bounds.getLowerRight().getLongitude() ) );

 var horizontalLine = new MQA.LineOverlay();
 horizontalLine.setValue('shapePoints', vertices);
 horizontalLine.setValue('color', '#0000FF');
 horizontalLine.setValue('borderWidth', 6);
 mapquestMap6.addShape(horizontalLine);
}

function mapquestPlotText()
{
 var textShape = new MQA.Poi(mapquestMap6.getCenter());
 textShape.setValue( 'HTMLContent', 'BULLSEYE');
 mapquestMap6.addShape(textShape);
}

function mapquestPlotImage()
{
 var imageShape = new MQA.ImageOverlay();
 var vertices = new MQA.LatLngCollection();
 vertices.add( mapquestMap6.getCenter() );
 var center = mapquestMap6.llToPix( mapquestMap6.getCenter() );
 var offset = new MQA.Point( center.getX() + 34, center.getY() + 50 );
 vertices.add( mapquestMap6.pixToLL( offset ) );
 imageShape.setValue('shapePoints', vertices);
 imageShape.setValue('imageURL', 'target.jpg');
 mapquestMap6.addShape(imageShape);
}

That is it!

Well, not really. There is a whole lot more to explore in these API's, but with this post we have covered all of the essentials you need to get started. Now it is time to get in there and explore, try some things, and see what you can do. I hope you have found this series informative and helpful. As you start on your own mapping projects, be sure to reference the vendor's development site for full documentation.

Wednesday, April 7, 2010

Developing with Online Mapping APIs - Part 5: Event Handling

We've covered a lot of ground, and our maps are now able to display rich data to our users. The next step is to allow users to interact with the map and to react to the user's input in a meaningful way. In order to do that we need to be able to handle mapping events. There are three general categories of events:

  • Keyboard and Mouse Events
  • Map Events
  • Point of Interest Events

Keyboard and mouse events are just what you might think. These events indicate that the mouse has been clicked, double-clicked, or a keyboard key has been pressed. In relation to the map display we can determine at what X and Y position the mouse was clicked.

Mapping events are related to changes in what is displayed. For instance, the user may utilize a control to pan the map north. This would be associated with a particular event. The same is true for changing the zoom or even the type of map that is displayed.

Point of interest events are specific actions taken on a point of interest. If the map displays several POI's, an event may be associated with a click action on an individual POI.

Each mapping API has a slightly different method for handling events. In many cases, a single user action may result in triggering a variety of events.

Bing

Interact with the map to see a log of the events that are received.
Listen for:
KeyboardMouseMap
onkeypress onclick onchangemapstyle
onkeydown ondoubleclick onchangeview
onkeyup onmousedown onendpan
  onmouseup onendzoom
  onmouseover onresize
  onmouseout onstartpan
  onmousewheel onstartzoom
  onmousemove  

The VEMap class exposes an AttachEvent method which is used to subscribe to events. The method accepts two parameters: the name of the event to listen for and a reference to a function that will be called when the event occurs.

bingMap5.AttachEvent("ondoubleclick", bingEventHandler);

The VEMap.DetachEvent method takes the same parameters and will unsubscribe from an event.

bingMap5.DetachEvent("ondoubleclick", bingEventHandler);

The event handling function will be called with a single parameter. The parameter contains the details for the event. If the event is relative to a marker or other shape that is drawn on the map, the elementID field of the event details will contain the ID of the shape. The ID for each shape is maintained by the VEMap instance. Use the VEMap.GetShapeByID method to retrieve a reference to the shape instance.

The mapX and mapY properties indicate where on the map the event took place. These may be null for events that do not have a point on the map. To convert these values to a lattitude and longitude use the VEMap.PixelToLatLong method.

function bingEventHandler(eventDetails)
{
 var eventLog = document.getElementById("bingEventLog");
 var logEntry = "event received: " + eventDetails.eventName + "\n";
 logEntry = logEntry + "\tMap X:\t" + eventDetails.mapX + "\n";
 logEntry = logEntry + "\tMap Y:\t" + eventDetails.mapY + "\n";
 logEntry = logEntry + "\tZoom:\t" + eventDetails.zoomLevel + "\n";
 logEntry = logEntry + "\tElement ID:\t" + eventDetails.elementID + "\n";
 eventLog.value = logEntry + eventLog.value;
}

I've only hooked up a portion of the events that are available, and only a selection of the event details are shown on each log entry. Be sure to read through the MSDN documentation on Bing VEMap Events for the full set of events and event details. These events allow for you to write code that reacts to the user's actions. In this way you can load data that is within the viewing area when the map is moved, follow the mouse movement across the map, and a variety of other interesting responses.

Google

Interact with the map to see a log of the events that are received.
Listen for:
GMap2GMarker
click click
dblclick dblclick
movestart  
move  
moveend  
mouseover mouseover
mousemove  
mouseout mouseout
dragstart dragstart
drag drag
dragend dragend
zoomend  

The Google API uses static methods on the GEvent class for registering event listeners. This is a similar difference to the Bing implementation as we saw with geocoding. Where the Bing API tends to roll functionality into the VEMap class as a one-stop shop for functionality, the Google API encapsulates functionality in separate classes.

The GEvent.addListener method is used to register a listener for an event. This method takes three parameters: the object that is the source of the event, the name of the event, and a reference to the function to call when the event is fired.

GEvent.addListener(source:Object, event:String, handler:Function)

Calling this method returns a reference to a GEventListener instance. This reference is used when calling the GEvent.removeListener method to deregister a listener for an event.

GEvent.removeListener(handle:GEventListener)

The Google event handlers are much different in invocation than the Bing event handler. The Bing event handler receives single parameter which is of the same type each time. The Google event handlers receive different parameters based on the type of event that was fired. This can make developing a cetralized event handler a bit of a chore. One other noticeable difference is that while Bing gives the X and Y coordinates on the map, the Google event receives lattitude and longitude where applicable.

function googleEventHandler(param1, param2)
{
 var eventLog = document.getElementById('googleEventLog');
 var eventLogEntry = 'Event fired:\n';
 if ( this == googleMap5 ) 
 { 
  eventLogEntry = eventLogEntry + '\tSource:\tMap\n';
  if ( param1 != null )
  {
   eventLogEntry = eventLogEntry + '\tParam1:\t' + param1 + '\n';
  }
  if ( param2 != null )
  {
   eventLogEntry = eventLogEntry + '\tParam2:\t' + param2 + '\n';
  }
 }
 if ( this == googleMarker5 )
 { 
  eventLogEntry = eventLogEntry + '\tSource:\tMarker\n';
  if ( param1 != null )
  {
   eventLogEntry = eventLogEntry + '\tLattitude:\t' + param1.lat() + '\n';
   eventLogEntry = eventLogEntry + '\tLongitude:\t' + param1.lng() + '\n';
  }
 }
 eventLog.value = eventLogEntry + eventLog.value;
}

A key difference between the Google event handlers and the Bing event handlers is that the JavaScript 'this' reference is set to the source of the event at the time when the event handler is called. This means that where code using the Bing API would need to get the element ID of the VEShape for an event, the Google event handler code can simply use the 'this' reference. It is possible to go one step further by instructing the Google API to bind an event to an object other than the source of the event using the GEvent.bind method.

GEvent.bind(source:Object, event:String, object:Object, method:Function)

When an event handler is registered in this manner, 'this' will now refer to the object instance given as the third parameter to the function. The bind method returns a reference to a GEventListener just like the addListener method. Unbinding the event handler is achieved by calling the GEvent.removeListener method with a reference to this GEventListener.

Another convenient feature of the Google event system are methods for triggering events without user action, and for clearing all event handlers. The GEvent.trigger method allows for the simulating of events on mapping elements, as well as the introduction of custom events. For instance, if you would like to simulate the user clicking on a marker (and thus fire all of the handlers for that event) you could call:

GEvent.trigger(gmarker, "click");

This will always fire all of the "click" handlers on teh gmarker instance, rather than attempting to keep track of these references on your own. In addition, you can invent custom events for any element. Simply add your handler using the same GEvent.addListener method with a reference to your custom event name. When you need to fire the custom event, call GEvent.trigger to fire it.

The GEvent class also exposes GEvent.clearListeners and GEvent.clearInstanceListeners. The GEvent.clearListeners method will remove all handlers for a specific event on an element. The GEvent.clearInstanceListeners will remove all handlers for all events.

Yahoo

Interact with the map to see a log of the events that are received.
YMapYMarkerYGeoRSS
endMapDraw endMapDraw onEndGeoRSS
changeZoom changeZoom  
startPan startPan  
onPan onPan  
endPan endPan  
startAutoPan startAutoPan  
endAutoPan endAutoPan  
MouseDown MouseDown  
MouseUp MouseUp  
MouseClick MouseClick  
MouseDoubleClick MouseDoubleClick  
MouseOver MouseOver  
MouseOut MouseOut  
KeyDown KeyDown  
KeyUp KeyUp  
onEndGeoCode openExpanded  
polyLineAdded closeExpanded  
polyLineRemoved openSmartWindow  
endMapDraw closeSmartWindow  
endMapDraw    
onEndLocalSearch    
onEndTrafficSearch    

The Yahoo Map API uses the YEvent class in much the same way that the Google API exposes the GEvent class. The YEvent class has a single static method, YEvent.Capture, for registering an event handler.

YEvent.Capture(object:[YMap|YMarker], event:EventsList, callback:Function, privateObject:Object)

As with the GEvent.addListener method, the YEvent.Capture method takes a reference to either a YMap instance or a YMarker instance, the event to listen for, and a reference to the function to call when the event is fired. In addition, the Capture method also accepts an optional object reference that will be passed to the handler when it is fired. Another difference is that the Yahoo Maps API lists all known event types as part of the EventsList object. The full list of available events can be retrieved by calling the YMap.getEventsList() method. The event list can also be found in the documentation for the YEvent class.

Unlike the Bing and Google maps API's, this is the only method for dealing with events. There is no way to deregister your handler code. Even worse, the Yahoo Maps documentation is silent on what sort of parameters are passed to the event handler for each event type. After some trial and error and snooping through the example code, I've been able to sort out a bit of the story, but it would be much better if Yahoo would make this more clear in their documentation. An event will send either one or two parameters to the event handler. The first parameter contains information on the source of the event (the YMap or the YMarker).

  • YGeoPoint
    • Lat
    • Lon
  • thisObj
  • zoomObj
    • current
    • previous

The YGeoPoint is the latitude and longitude as it relates to the event. If this is a click event, it is the location of the click. The second optional parameter has two properties, Lat and Lon, indicating the position of the mouse. As this is not documented, I can't guarantee this will be the behavior for all events, so be sure to experiment with what values you get back in your event handler.

function yahooEventHandler( eventDetails, clickDetails )
{
 var eventLog = document.getElementById('yahooEventLog');
 var logEntry = 'Event Received:\n';
 if (eventDetails != null)
 {
  if (eventDetails.thisObj == yahooMap5)
  {
   logEntry = logEntry + '\Source:\tyahooMap5\n';
  }
  if (eventDetails.thisObj == yahooMarker5)
  {
   logEntry = logEntry + '\Source:\tyahooMap5\n';
  }

  if (eventDetails.YGeoPoint != null)
  {
   logEntry = logEntry + '\tLattitude:\t' + eventDetails.YGeoPoint.Lat + '\n';
   logEntry = logEntry + '\tLongitude:\t' + eventDetails.YGeoPoint.Lon + '\n';
  }
  if (eventDetails.zoomObj != null)
  {
   logEntry = logEntry + '\tZoom Before:\t' + eventDetails.zoomObj.previous + '\n';
   logEntry = logEntry + '\tZoom After:\t' + eventDetails.zoomObj.current + '\n';
  }
 }
 if (clickDetails != null)
 {
  logEntry = logEntry + '\tMouse Lattitude:\t' + clickDetails.Lat + '\n';
  logEntry = logEntry + '\tMouse Longitude:\t' + clickDetails.Lon + '\n';
 }
 eventLog.value = logEntry + eventLog.value;
}
 

As with the Google event handling, it can be very difficult to determine just what type of event triggered the call. This makes creating a centralized event handler a bit of a chore, so you'll want to create a unique handler for each event type of you want different behavior for each type of event.

MapQuest

Interact with the map to see a log of the events that are received.
MQA.TileMapMQA.Poi
click click
dblclick dblclick
mouseup mouseup
mousedown mousedown
dragstart mouseover
dragend mouseout
drag  
zoomStart  
zoomend  

Hey, we've got our friendly MapQuest map back! Like the Yahoo and Google mapping APIs, the MapQuest API uses a class with static members for hooking up event handlers: MQA.EventManager. The MQA.EventManager has three methods:

  • MQA.EventManager.addListener(source:Object, eventType:String, handler:Function, target:Unknown)
  • MQA.EventManager.removeListener(source:Object, eventType:String, handler:Function, target:Unknown)
  • MQA.EventManager.clearListeners(source:Object, eventType:String)

When the event handler is called it receives a single parameter of type MQA.Event. Unfortunately, the properties of this class are all set based on the type of event that was fired. Couple that with a lack of documentation surrounding events, and we're back in the same position we were with the Yahoo mapping API. The best source of information I have found is in the MapQuest JavaScript API Developer's Guide, section 13 Custom Events. At the end of this section is a list of the events available for map, POI, overlay, and other mapping element types. Interpretting this documentation, we find that the MQA.Event object has the potential to contain the following data (although not all properties will always be populated, so be sure to check for null):

  • MQA.Event.eventName
    • Name of the event. This will always be present.
  • MQA.Event.button
    • Button associated with the mouse event.
  • MQA.Event.domEvent
    • Name of the DOM event correlating to this event.
  • MQA.Event.poi
    • Reference to the MQA.Poi relevant to this event.
  • MQA.Event.xy
    • Map X,Y coordinates for this event (such as a mouse click).
  • MQA.Event.ll
    • Map Lattitude and Longitude for this event.
  • MQA.Event.srcObject
    • Source of the event.
  • MQA.Event.prevZoom
    • Previous zoom level.
  • MQA.Event.zoom
    • Current zoom level.
  • MQA.Event.clientX
    • X coordinate within the visible portion of the page.
  • MQA.Event.clientY
    • Y coordinate within the visible portion of the page.
  • MQA.Event.dragPercentage
    • (guessing) percentage of the map that was dragged(?)
  • MQA.Event.dragDirection
    • (guessing) Direction the map was dragged(?)
  • MQA.Event.prevMapType
    • MapType in use prior to change in map type.
  • MQA.Event.mapType
    • MapType currently in use.

Using this in code, we can look for data in our event handler.

function mapquestEventHandler(eventDetails)
{
 var eventLog = document.getElementById('mapquestEventLog');
 var logEntry = 'Event Received:\n';
 if (eventDetails != null)
 {
  if ( eventDetails.eventName != null )
   logEntry = logEntry + '\teventName:\t' + eventDetails.eventName + '\n';
  if ( eventDetails.button != null )
   logEntry = logEntry + '\tbutton:\t' + eventDetails.button + '\n';
  if ( eventDetails.domEvent != null )
   logEntry = logEntry + '\tdomEvent:\t' + eventDetails.domEvent + '\n';
  if ( eventDetails.poi != null )
   logEntry = logEntry + '\tpoi:\t' + eventDetails.poi + '\n';
  if ( eventDetails.xy != null )
   logEntry = logEntry + '\txy:\t' + eventDetails.xy + '\n';
  if ( eventDetails.ll != null )
   logEntry = logEntry + '\tll:\t' + eventDetails.ll + '\n';
  if ( eventDetails.srcObject != null )
   logEntry = logEntry + '\tsrcObject:\t' + eventDetails.srcObject + '\n';
  if ( eventDetails.prevZoom != null )
   logEntry = logEntry + '\tprevZoom:\t' + eventDetails.prevZoom + '\n';
  if ( eventDetails.zoom != null )
   logEntry = logEntry + '\tzoom:\t' + eventDetails.zoom + '\n';
  if ( eventDetails.clientX != null )
   logEntry = logEntry + '\tclientX:\t' + eventDetails.clientX + '\n';
  if ( eventDetails.clientY != null )
   logEntry = logEntry + '\tclientY:\t' + eventDetails.clientY + '\n';
  if ( eventDetails.dragPercentage != null )
   logEntry = logEntry + '\tdragPercentage:\t' + eventDetails.dragPercentage + '\n';
  if ( eventDetails.dragDirection != null )
   logEntry = logEntry + '\tdragDirection:\t' + eventDetails.dragDirection + '\n';
  if ( eventDetails.prevMapType != null )
   logEntry = logEntry + '\tprevMapType:\t' + eventDetails.prevMapType + '\n';
  if ( eventDetails.mapType != null )
   logEntry = logEntry + '\tmapType:\t' + eventDetails.mapType + '\n';
 }
 eventLog.value = logEntry + eventLog.value;
}

With the Google and Yahoo map event handlers, we couldn't tell which event had been fired. The MapQuest API will always include the event type in the MQA.Event parameter that is passed to the event handling function. If your goal is to have an event logger, this can be very helpful.

Is That It?

While each of the APIs have some similar elements regarding event handling, what became most evident is the quality fo the documentation for each of the mapping APIs. The Yahoo mapping API is simply no help at all when trying to figure out how to handle events. Unless you are only interested in presenting static map information, this could be a real drawback when attempting to create an interactive site. The same is largely true of the MapQuest documentation. The Bing and Google mapping documentation is quite good, and each provides a slightly different method for hooking up events.

With this post we've covered all of the basics for getting a map on your page, displaying some useful information, and allowing for rich interactivity. Now it is time to get creative. In the next post I'll show you how to do some custom drawing which allows you to some very interesting things when presenting information. As always, if you are eager to dive in and learn more, visit the vendor's development site for full documentation.

Monday, March 29, 2010

Developing with Online Mapping APIs - Part 4: Geocoding and Reverse-Geocoding

Centering the map and placing points of interest is fairly painless when you know the lattitude and longitude of your POIs, but most people don't think about their location in terms of lat and long. Instead, most people think in terms of addresses. Geocoding is the process of converting an address to lattitude and longitude. Geocoding is a complex process, and for that reason each mapping vendor places limits on the number of geocoding requests that are permitted each day. This number is in the multiple thousands typically, so it will not impact low traffic sites, but for larger sites with many thousands or millions of visitors it can be a concern. There are two methods for coping with this limitation: minimize the necessity of geocoding by storing as much data as possible with a lattitude and longitude reference, or make arrangements with the vendor for additional geocoding requests.

Just as your site visitors are not accustomed to entering locations as lattitude and longitude, they are likewise not accustomed to reading locations as lattitude and longitude. When reading points of interest from the map, the user will prefer to read addresses instead. The process of converting from a lattitude and longitude to a address is called reverse-geocoding. When using geocoding, the address is known, so conversion to a lattitude and longitude is fairly accurate. When reverse-geocoding, however, the requested point may be very far from any known address. For this reason, reverse-geocoding can give some very strange results. The best results with reverse-geocoding are received when the geospatial coordinates to convert are near a road.

When using geocoding or reverse geocoding on your site, be sure to keep your user's privacy in mind. If you will be making the user's location public to others, it is a good idea to allow the user to specify the accuracy of the location. If your app will be taking in a lattitude and longitude from the user's location, consider making only the city, zip code, or state information readable by others rather than a full street and number address.

Bing

Click the map anywhere to reverse-geocode that point.
Address To Geocode:

Bing uses an overloaded VEMap.Find method on the map object for performing geocoding. The Find method can be used to search for a named business or category of business, a street address, a place name, an intersection, or virtually anything else you might think to write into the search bar of the Bing Maps portal. The Find method is tightly coupled with the map display, and as part of the execution of the method can be instructed to add a pin to the map automatically for all matching locations, add the POIs to an existing map layer, and to page results such that only a set number of matches are returned at a time. This flexibility can save you a lot of the overhead of re-centering the map on the proper location, adding the POI marker and other map management. However, this flexibility also makes the Find method a little confusing to use at first. For the purpose of this exercise, we are only looking to turn an address into a lattitude and longitude. For this most basic use of the Find method, the following code will suffice.

function bingGeocodeLocation(address)
{
 bingMap4.Find( null, address, null, null, null, null, null, null, null, null, bingGeocodeLocationCallback );
}

function bingGeocodeLocationCallback( shapeLayer, findResult, places, moreMatchesAvailable, errorInfo )
{
 if ( places != null )
 {
  bingMap4.DeleteAllShapes();
  var placeIndex = 0;
  for ( placeIndex = 0; placeIndex < places.length; placeIndex++ )
  {
   var nextShape = new VEShape( VEShapeType.Pushpin, places[placeIndex].LatLong );
   bingMap4.AddShape(nextShape);
  }
 }
}

We only needed to supply two parameters for our geocoding call: the address to be geocoded and a callback method to handle the results to the request. The Find method is executed asynchronously. When the call is completed the callback method passed as the last parameter will be called. If the address was found, the places parameter will contain an array of places that match the address. In simple geocoding calls the array will likely have just one element, but code should be prepared to handle multiple matches. The callback to the Find method is non-reentrant, meaning that if another call is made to the Find method before the first call completes, the results to the first Find call will be lost.

Reverse-geocoding is done using the VEMap.FindLocations method. Like the Find method this call is performed asynchronously with the last parameter being the callback method to execute when results are found. Unlike the Find method, the FindLocations method has the single purpose of reverse-geocoding a lattitude and longitude. Also, the FindLocations method is only supported in the United States.

var bingMarker4;

function bingReverseGeocodePoint(latLongToReverseGeocode)
{
 bingMap4.DeleteAllShapes();
 bingMarker4 = new VEShape(VEShapeType.Pushpin, latLongToReverseGeocode);
 bingMap4.AddShape(bingMarker4);
 bingMap4.FindLocations( clickLatLng, bingReverseGeocodePointCallback );
}

function bingReverseGeocodePointCallback( possibleAddresses )
{
 if ( possibleAddresses != null )
 {
  var addressIndex = 0;
  var addressList = "";
  for ( addressIndex = 0; addressIndex < possibleAddresses.length; addressIndex++ )
  {
   addressList = addressList + "
" + possibleAddresses[addressIndex].Name; } if (bingMarker4 != null) { bingMarker4.SetDescription(addressList); } bingMap4.ShowInfoBox(bingMarker4); } }

If any potential address matches were found for the lattitude and longitude, the parameter to the callback method will be non-null. The parameter is an array of type VEPlace. The Name property of each VEPlace gives a candidate address that the lattitude and longitude might resolve to.

Google

Click the map anywhere to reverse-geocode that point.
Address To Geocode:

Unlike Bing, Google provides Geocoding as an independent web service. The GClientGeocoder object exposes a getLatLng method that takes a string parameter containing the address to geocode, and a reference to a callback function. The callback function has one parameter, the GLatLng of the geocoded address. If the address could not be geocoded this value will be null.

The GClientGeocoder object has no information about any maps on your page. This leaves you to write the code that will act on the geocoded address. This means a bit more code for you if you want to center the map and mark the location, but it also means the geocoding method is clean and fast. In addition, the GClientGeocoder can utilize a cache that keeps a client side mapping of locations to addresses. This can greatly speed up execution when the same address could be geocoded again and again from the site.

function googleGeocodeLocation(addressToGeocode)
{
    googleGeocoder.getLatLng(addressToGeocode, googleGeocodeLocationCallback);
}

function googleGeocodeLocationCallback( place )
{
 if ( place != null )
 {
  googleMap4.clearOverlays();
  googleMap4.setCenter(place);
  googleMap4.addOverlay(new GMarker(place));
 }
}

In addition to the getLatLng method, the getLocations method can be used to lookup a lattitude and longitude for an address. The difference between getLatLng and getLocations is that the getLocations method will call the callback function with a JSON object with richer information from the geocoding execution. The JSON data is defined as follows:

  • name
  • Status
    • code
    • request
  • Placemark
    • address
    • AddressDetails
      • Country
        • CountryNameCode
        • AdministrativeArea
          • AdministrativeAreaName
          • SubAdministrativeArea
            • SubAdministrativeAreaName
            • Locality
              • LocalityName
              • Thoroughfare
                • ThoroughfareName
              • PostalCode
                • PostalCodeNumber
      • Accuracy
    • Point
      • coordinates

That is a whole lot of data. Fortunately, for the purpose of geocoding, we are only interested in the coordinates. Notice that using this method for geocoding allows for multiple results to be returned. This is rare, but possible.

The GClientGeocoder class also performs reverse-geocoding using the same getLocations method. Rather than passing a string to this method, pass a GLatLng. The same JSON content will be returned, but in this case our interest will be in the AddressDetails data. Each nesting level gives us a more specific form of the address. The geocoder / reverse-geocoder does not guarantee accuracy, nor that all of this data be populated.

function googleReverseGeocodePoint(latlng)
{
 googleMap4.clearOverlays();
 googleMarker4 = new GMarker(latlng);
 googleMap4.addOverlay(googleMarker4);
 googleGeocoder.getLocations(latlng, googleReverseGeocodePointCallback);
}

function googleReverseGeocodePointCallback( response )
{
 if ( response != null && response.Status.code == 200 )
 {
  var addressIndex = 0;
  var addressList = "<div class='googleInfoWindow'><ul>";
  for ( addressIndex = 0; addressIndex < response.Placemark.length; addressIndex++ )
  {
   addressList = addressList + "<li>" + response.Placemark[addressIndex].address;
  }
  addressList = addressList + "</ul>";

  if (googleMarker4 != null)
  {
   googleMarker4.openInfoWindowHtml(addressList);
  }
 }
}

A little side discussion here. You might look at that code and think a couple of things. One, "Hey, he used an Info Window, and we haven't seen that yet for the Google API." Well...so I cheated. Anyway, what you see there for the Info Window is about all you need to know. You can open one using the openInfoWindowHtml method on a GMarker, and the parameter can be just about any HTML you like. The second thing you might be wondering is why I set the class to 'googleInfoWindow'. When I first coded this up and ran it on the page, the Info Window was blank. Turns out, the the body color for text was being used for the text within the Info Window. White on white wasn't showing up so well, so I'm using the 'googleInfoWindow' class to be sure that my text is printed in black.

Yahoo

Address To Geocode:

Like the Bing API, the Yahoo! Maps API exposes geocoding functionality via a method on the map class: YMap.geoCodeAddress. This method takes just one parameter, which is the address to geocode.

function yahooGeocodeLocation(addressToGeocode)
{
 yahooMap4.geoCodeAddress(addressToGeocode);
}

The geocoded result is returned by the map instance firing the onEndGeoCode event (leading me to believe that I should have covered events before getting into geocoding, oh well). In order to get the result of the geocoding request, the code must register a handler for the onEndGeoCode event. This is done by using the YEvent.Capture method, which takes three parameters: the event source, the event to listen for, and the function to call when the event fires.

function yahooInitializer4()
{
 yahooMap4 = new YMap(document.getElementById('yahooMapDiv4'));
 yahooMap4.addPanControl();
 yahooMap4.addTypeControl();
 yahooMap4.addZoomLong();
 yahooMap4.addZoomScale();
 yahooMap4.drawZoomAndCenter(new YGeoPoint(39.768519, -86.158041), 5);
 YEvent.Capture(yahooMap4, EventsList.onEndGeoCode, yahooOnEndGeoCodeListener);
}

The callback method receives a single parameter containing the geocoding result, if the execution succeeded. Unfortunately the Yahoo! Maps AJAX Web Services documentation does not provide a definition for the parameter that is returned. From what I can tell by inspecting the value, the parameter is defined as shown below. Note, there is no guarantee that this is correct, or that Yahoo! will continue to use this definition, so be sure to verify the response when implementing your own code.

  • eventObjectGeoCode
    • Address
    • GeoPoint
      • Lat
      • Lon
    • ThisMap
    • success

The Address is a string containing the text address that was sent to the geocoder. The GeoPoint field contains the lattitude and longitude the address resolved to. The ThisMap field contains a reference back to the map that raised the event, and the success field indicates if the geocoding execution succeeded (1 == success). The method for getting geocoding results with Yahoo! Maps is unique in that multiple listeners can be attached to the event for completion of geocoding.

function yahooOnEndGeoCodeListener(result)
{
 if ( result != null )
 {
  yahooMap4.removeMarkersAll();
  var geocodedPoint = new YGeoPoint(result.GeoPoint.Lat, result.GeoPoint.Lon);
  yahooMap4.panToLatLon(geocodedPoint);
  yahooMap4.addMarker(geocodedPoint);
 }
}

The Yahoo! Maps API does not provide a mechanism for reverse geocoding.

MapQuest

Hmmmm, no map here. That can't be good. MapQuest offers a Geocoding and Reverse-Geocoding web service separately from the JavaScript mapping API. It is a RESTful web service, and works quite well. Unfortunately, in order to use the RESTful geocoding and reverse-geocoding web services provided by MapQuest you must create a proxy on your server to access them. This is to avoid cross domain scripting (your JavaScript code may not make calls to servers it was not loaded from). Previous versions of the MapQuest API did include a MQGeocode class that allowed for geocoding as part of the MapQuest JavaScript API, but that class is not part of the current API. All hope is not lost, however. In the beta for version 6.0 of the MapQuest API the geocoding function makes a triumphant return in the form of MQA.Geocoder.

Creating a JavaScript proxy to be hosted on your server for the purpose of accessing the RESTful geocoding services provided by MapQuest is beyond the scope of this series.

Is That It?

This post highlighted some pretty drastic differences between the APIs provided by each vendor. Bing provides a highly flexible method for geocoding that is tightly coupled to the map. Google provides a clean and fast geocoding mechanism that is independent of the map. Yahoo provides base geocoding services but no reverse-geocoding. Finally, MapQuest requires the implementation of a JavaScript proxy in order to even access their geocoding services. As part of working with geocoding services we've also touched a bit on event handling in each API, as well as the Info Window provided by the Google API. Next, we'll take a more complete look at how to handle events in for each mapping system. As always, if you are eager to learn more just follow these links to the vendor specific API documentation.